Saving time & money is easy if you Clean your own D-SLR Sensor
. . . Read On
'DISCLAIMER'
* Please be advised that this is for educational purposes only, it's not difficult by any means nor is it rocket science but I do not recommend doing this yourself if you do not feel comfortable in your abilities around sensitive equipment or not having the proper cleaning equipment. If you have confidence in your abilities after reading this and would like to try it be my guest I can't nor would I try to stop you. Using this method is a snap and will save you not only time & money but you will always have images clean of any dust & dirt spots without having to take your camera out of service to send it in to the manufacture or shop at an average of $70+ PER cleaning and 1-2 weeks without your gear. If after you read this article & you feel confident, you'll be cleaning your sensor in less the 10 minutes or less. If not please continue to send it to a professional for cleaning & service. I'm a professional photographer NOT a certified technician and I'm only providing you with this information for educational purposes ONLY, I'm warning you straight out if done incorrectly you can cause severe damage to your equipment and it will be pricey to have repaired. If you choose to try cleaning your sensor after reading this you are doing it AT YOUR OWN RISK and I DO NOT accept any responsibility or LIABILITY for any damage that may occur! So don't be sending me your email's saying I didn't warn you. I'm not trying to scare you, I'm just trying to be honest (and cover my ass). So Please read through this entire article at least once before attempting this on your own so you have an idea of what I'm talking about.One of the main reasons why I like this method is that it's cheap, quick (less then 10 minutes from start to finish) and can be done at home, in the studio or in the field. There are many methods available you can use to clean the sensor but I use this on a weekly (sometimes daily) basis depending on how dirty / dusty of an environment I'm working in and it hasn't failed me YET. No matter how careful you are in the field swapping lenses your bound to get dust on the sensor sooner or later. Having dust spots on your images is not only ugly but as someone who makes a living shooting 100's of images a week it is very costly to me in time fixing images or tossing them in the trash bin. So if your ready, read on & off we go to a quick efficient way to clean set of images free of foreign matter !

WHAT YOU WILL NEED:
* Proper Size Sensor Wand for your model
* PEC PADS
* ROCKET BLOWER (or simular air blower) *DO NOT USE CANNED AIR!
* ECLIPSE "E2" Sensor Cleaning Fluid
* Scotch Tape
* Steady Hands
Listen, there are other BRANDS that may be cheaper out there of cleaners, blowers and cleaning cloth material I listed, but I use these because their PROVEN to work correctly & won't harm your equipment when used properly along with being the stuff professional shops & manufactures use (hey if it's good enough for them then that's what I wanna use on my pricey gear right?) I don't make any money from selling this stuff nor do I have any affiliation with the companies who do. Most if not all can be purchased at your local camera store and on the Internet.
First read your cameras manual and learn how to engage the MIRROR UP function. The mirror has to be out of the way in order to get to your 'low pass filter' (from here on in I'll be calling it the SENSOR. Be sure to have a FULLY Charged battery so that your body doesn't loose power in the middle of cleaning as this can cause severe damage to your equipment. I know my Nikon's will not even allow you to raise the mirror without having at least a 3/4 charge on the battery for this specific safety reason so you know it must be important right!
PREPPING YOUR SENSOR WAND:
PEC PADS: Are Top of the line Non-Abrasive Wipes which are 99.999% Free of Contaminates,Lint Free & Ultra Soft (BTW they are Great for cleaning lenses, binoculars and cell phone screens too!)
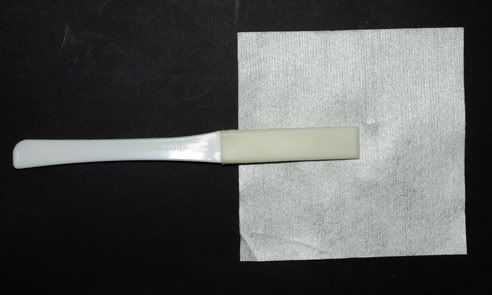
Take a PEC*PAD and hold it in your weak hand or lay it on a CLEAN surface (I like to use a fresh coated paper plate). Lay the Sensor wand in the middle of the Pec Pad (as shown)

Now fold the other half over the tip of the wand so that 50% of the Pec Pad is on top and 50% on the bottom *as shown*
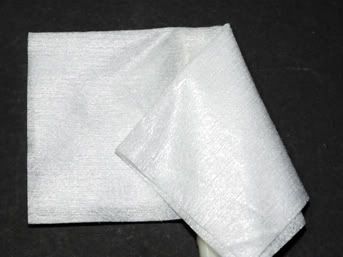
Now fold one side downward at an angle away from the tip
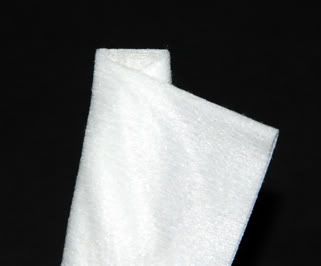
Doing the same thing fold the remaining side over the first flap at an angle and then continue to wrap it around the sensor wand stick until all the excess wrapped tight around it. You only want the single layer of Pec Pad on the tip for cleaning purposes. This allows it to lay flat for even contact with the sensor as well.

Take a small piece of scotch tape placing it around the Pec Pad and sensor wand to secure it to the base AWAY from the tip
Your ready to start !
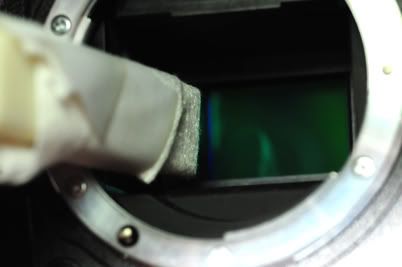
Remove your lens and put the mirror up. Once the mirror is out of the way, take your body in one hand holding the opening towards the ground and give it some good blasts with your blower to free any loose dust from the sensor and any floating around inside your body walls. Holding it upside down allows it to fall out instead of landing back on the sensor defeating the whole purpose of blowing it OUT.

Visually inspect the sensor under a strong light to see if you got all loose material and foreign matter off the sensor and ensure there is nothing inside the body that may cause damage while your cleaning like any bits of sand or hard dirt you may have in their which will cause SEVERE damage to your sensor if not removed before swiping the sensor & you will kick yourself VERY HARD for not taking the extra few seconds to visually check it before you clean, that I can PROMISE YOU!
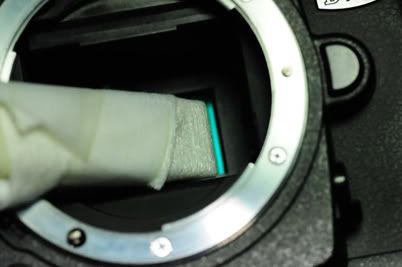
OK if it's clear it's time for the scary stuff, place a few drops (2-3 ONLY) of ECLIPSE E2 on the tip of the sensor wand and head for the sensor. You have to be quick on this step because the E2 dries / evaporates VERY fast and you don't want to be dragging it across the sensor when it's dry. Not only because you cause scratch the sensor causing major damage but any oils or matter on the sensor will be smeared across it making it much harder to clean properly.  You want the sensor wand to make one continuous stroke from one side of the sensor to the other. This prevents having any dust from get caught or gathering in the middle of the sensor. Place it FLAT & tilted on the angle the wand is cut to and pull it across using a small but even amount of pressure until you reach the end. Now tilt the wand to the oppisite side & make a second pass starting from the opposite side of the sensor straight across to the edge once again, lift it straight up away from the sensor and out of the body. Check your sensor under a bright light now to ensure you got all of the nasty dirt & dust spots off and YOUR DONE ! Make sure everything is out of the camera body and turn the power off to your camera to release the mirror back into possition. Pretty simple right?
 You want the sensor wand to make one continuous stroke from one side of the sensor to the other. This prevents having any dust from get caught or gathering in the middle of the sensor. Place it FLAT & tilted on the angle the wand is cut to and pull it across using a small but even amount of pressure until you reach the end. Now tilt the wand to the oppisite side & make a second pass starting from the opposite side of the sensor straight across to the edge once again, lift it straight up away from the sensor and out of the body. Check your sensor under a bright light now to ensure you got all of the nasty dirt & dust spots off and YOUR DONE ! Make sure everything is out of the camera body and turn the power off to your camera to release the mirror back into possition. Pretty simple right?
NOTE:
Depending on how dirty it was you may have to make another pass or 2, but before you do add another drop or 2 of E2 on the wand, most of what you applied a few seconds ago will be dry already and you don't wanna drag a dry pad across the sensor face. Some even recommend changing the Pec Pad if you have to make another pass, that's up to you. If my sensor was really dirty I'll change it, if I was only cleaning a spot or 2 I'll leave it for another pass but certainly change it after 2 passes. Be sure not to add too much E2, you don't want the pad soaking wet or dripping, a little goes a long way and too much may drip down into the sensor and again your messing with fire. This stuff dries INCREDIBLY FAST (it's Ethanol) so once you apply it to your pad immediately make your cleaning pass. Oh also remember to take the E2 out of your gear bag before flying, it's not allowed on planes from what I have read.
I told you this isn't rocket science. It's just a little nerve racking the first few times thinking about how much it will cost you if you screw this up LOL. As long as you take your time and use common sense you should be just fine. After a few cleanings you'll be an old pro at this and it will become second nature with all the jitters gone and you'll realize that spending $70+ to have the same thing done by a shop or manufacture is just pure insanity and you'll wanna kick yourself for not learning how to do this a long time ago.
If you try this method feel free to leave a comment here for others to read, I'd like to know how you made out too ;)
Best Regards,
~Bill~
Best Regards,
~Bill~


No comments:
Post a Comment
Thanks for taking the time to let us hear what you have to say on this post ~Bill~